
The term Nahttypen refers to the different types of joining seams used in both the textile industry and mechanical or metal engineering (e.g., welding seams).
Each field and application uses specific seam types that offer their own advantages and disadvantages in terms of strength, appearance, elasticity, difficulty of processing, and material compatibility.
This article introduces the most common seam types used in sewing, followed by an overview of relevant welding seams, and finally offers practical tips for choosing and applying the right type for your project.
The goal is to inform comprehensively and practically — so whether you are a hobby sewer, fashion designer, textile engineer, or metalworker, you will gain solid knowledge about seam types and learn how to choose the most suitable one for your work.
Part 1: Seam Types in Sewing (Textile Applications)
Basic Concepts and Functions of Seams
Before we dive into specific seam types, it’s useful to understand what a seam actually does and what it must withstand:
- Joins pieces of fabric while securing raw edges
- Prevents fraying or tearing
- Affects the garment’s appearance (inside vs. outside view)
- Determines elasticity and stretch, especially for knit materials
- Handles varying loads depending on fabric strength
- Requires proper seam allowance and finishing (binding or serging)
Key Seam Types in Sewing
Below are the most important seam types, along with their properties, applications, and practical notes.
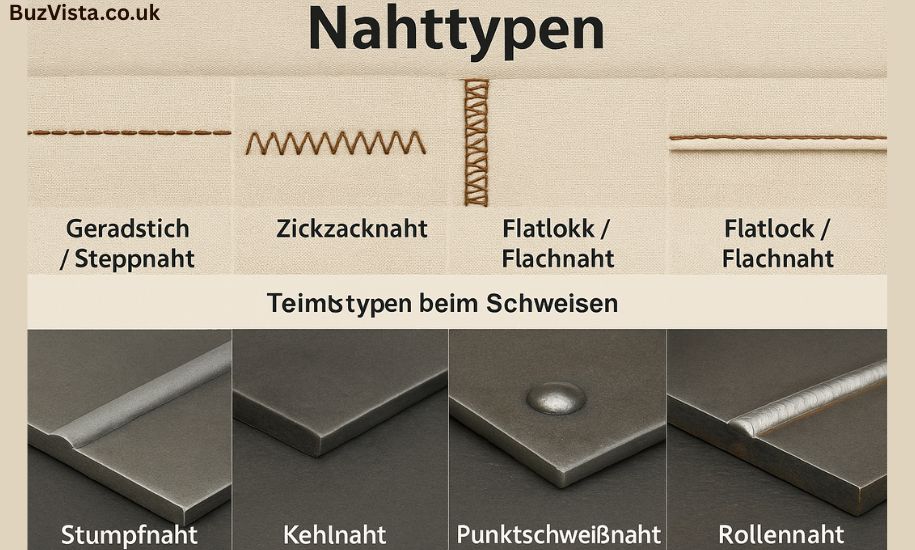
1. Straight Stitch / Lockstitch
Description
The classic straight line stitch found in every sewing machine. It uses two threads — upper and lower — interlocking to form a solid seam.
Advantages
- Strong and durable
- Nearly invisible when sewn neatly
- Works on most fabric types
Limitations
- Not stretchable — can break on elastic fabrics
- Raw edges must be finished separately
Best used for: Everyday garments, basic construction seams, home decor, bags, and accessories.
2. Zigzag Stitch
Description
The stitch moves side to side, providing flexibility and edge coverage.
Advantages
- Adds stretch and flexibility
- Helps finish raw edges
- Width and length easily adjustable
Limitations
- Less strong than reinforced seams
- More visible
Best used for: Stretchy fabrics, edge finishing, or repair work.
3. Overlock / Serger Stitch (3-, 4-, or 5-thread)
Description
This seam type sews, trims, and finishes fabric edges simultaneously using multiple threads.
Advantages
- Clean, professional edges
- Strong and stretchable
- Eliminates separate finishing steps
Limitations
- Requires a special machine (serger/overlocker)
- Thread tension and knife alignment can be tricky
Best used for: T-shirts, activewear, knitwear, and any fabric that stretches.
4. Flatlock Seam
Description
The flatlock joins two fabric edges so they lie flat next to each other, often with visible decorative stitching on both sides.
Advantages
- Very flat and low bulk
- Attractive on both sides
- Good elasticity
Limitations
- Less strong than heavy-duty seams
- Not ideal for thick fabrics
Best used for: Sportswear, underwear, or garments requiring minimal friction.
5. French Seam
Description
A two-step seam that encloses raw edges between two lines of stitching for a clean, finished look.
Advantages
- Very neat inside finish
- Protects delicate fabrics from fraying
Limitations
- Takes longer to sew
- Not ideal for thick or stiff fabrics
Best used for: Sheer, fine, or delicate materials such as silk or chiffon.
6. Flat-Felled Seam (Kappnaht)
Description
A strong, enclosed seam where seam allowances are folded over and stitched down — often double-stitched.
Advantages
- Extremely strong
- Looks tidy on both sides
- Ideal for high-stress areas
Limitations
- Adds bulk due to folded layers
- Difficult on heavy or thick fabrics
Best used for: Jeans, shirts, workwear, and bags.
7. Bound or Facing Seam
Description
The seam edges are wrapped with a separate strip of fabric or bias tape for reinforcement and decoration.
Advantages
- Decorative and protective
- Neatly finishes raw edges
Limitations
- Requires extra time and materials
- Visible edges may be tricky to align cleanly
Best used for: Unlined garments, outerwear, or decorative edges.
8. Topstitch / Edge Stitch / Reinforcement Stitch
Description
A visible line of stitching placed on the outer side of the fabric to reinforce or decorate.
Advantages
- Strengthens seams
- Adds visual detail
- Keeps seam allowances flat
Limitations
- Must be precise — visible mistakes show
- Wrong thread color stands out
Best used for: Collars, cuffs, pockets, decorative edges, and hems.
Part 2: Seam Types in Welding (Metal Applications)
When discussing Nahttypen in metalworking, the term refers to different welding joints.
Each weld type has its own geometry, penetration, and purpose depending on the load and materials involved.
Basic Classification
A weld type is determined by several factors:
- Joint geometry: butt, lap, T-joint, or corner joint
- Penetration depth: full or partial
- Process used: MIG/MAG, TIG, laser, or manual electrode welding
- Accessibility and position: flat, horizontal, vertical, or overhead
Common Welding Seam Types
1. Butt Weld (Stumpfnaht)
Description
Two plates or pipes are aligned in one plane and welded along the joint.
Applications: Sheet metal, pipe ends, plate assemblies
Variants: Full or partial penetration welds
Features: High strength when properly prepared and executed
2. Fillet Weld (Kehlnaht)
Description
Used when two pieces meet at an angle (T-joints, lap joints, or corners).
Applications: Frames, supports, and brackets
Features: Easy to execute; weld size defined by leg length (e.g., 5–6 mm)
3. Spot or Plug Weld
Description
Localized weld points that fuse sheets together without continuous seams.
Applications: Thin metal sheets, automotive bodywork, panel assemblies
Features: Minimal heat distortion, fast joining
4. Seam or Roller Weld
Description
A semi-continuous weld made using rotating electrodes or rollers.
Applications: Tanks, cylinders, containers
Features: Continuous, tight seams with uniform penetration
5. Specialized Welds (Groove, Plasma, Flash, Overlay)
Description
Advanced or process-specific welds tailored for high precision or surface treatment.
Examples:
- Groove welds for deep penetration
- Overlay welds for wear resistance
- Flash welds for joining rods or bars
Technical Standards & Notes
- Weld Symbols: Used in engineering drawings to represent type, size, and location
- Standards: Governed by ISO 2553 and ISO 4063
- Preparation: Correct edge beveling and gap spacing ensure full penetration
- Heat Control: Proper welding sequence prevents deformation and cracking
Part 3: Choosing the Right Seam Type
Selecting the correct seam type — whether sewing or welding — depends on several real-world factors.
Key Decision Criteria
- Material and Thickness
Thicker materials require stronger seams such as flat-felled (textiles) or full-penetration welds (metal). - Load and Stress
Seams under tension or shear must be reinforced — for example, double topstitching or butt welds. - Elasticity
Stretch fabrics need flexible seams such as zigzag, overlock, or flatlock stitches. - Aesthetic Quality
Visible areas call for neat, clean seams like French seams or bound finishes. - Tools and Skill Level
Some seams demand special machines or expertise (e.g., overlockers or TIG welding). - Time and Effort
For mass production, quick methods may suffice. For premium items, complex seams pay off in durability and beauty. - Technical Standards (for welding)
Certain industries require specific seam types under certification standards or safety regulations.
Part 4: Practical Examples and Execution Tips
Example 1: T-Shirt (Jersey Fabric)
- Main seams: Overlock (4-thread, with differential feed)
- Hems: Coverstitch or zigzag + topstitch
- Reinforcements: Topstitching around neckline
Example 2: Shirt (Cotton)
- Main seams: Straight stitch
- Edges: French seam or overlocked
- Details: Topstitching on pockets and plackets
Example 3: Jeans or Work Pants
- Main seams: Flat-felled seam
- Decorative seams: Contrasting topstitch
- Stress points: Multi-row reinforcement
Example 4: Steel Structure or Frame
- Flat plates: Butt weld, full penetration
- Supports: Fillet weld
- Thin covers: Spot or plug welds
Tips for Perfect Seams
- Always sew or weld straight and clean lines using guides or edge markings.
- Adjust stitch length or weld bead width according to material thickness.
- Plan proper seam allowances (minimum 1 cm for fabric).
- Match thread or filler material to the base material’s elasticity and strength.
- For metal: ensure clean edges, correct beveling, and stepwise welding to reduce distortion.
Conclusion
At first glance, seam types may seem purely technical — but in practice, they define the quality, comfort, and longevity of every project. Whether you are crafting a new garment, refining a pattern, or welding a sturdy frame, each seam reflects the union of material, stress, technique, and design.
With the insights in this guide, you can now make informed decisions about which seam type to use and how to execute it with precision.
May your future creations be durable, functional, and beautifully crafted — and thank you for reading on Buz Vista!